
|
Tech Note 30:
|
NS Basic/CE 8 introduced the ability to create installers for your app from directly within the NS Basic/CE IDE. This greatly simplifies the process. For information on creating installers on older versions of NS Basic, check the Tech Notes in the installation of that version. The information in this Tech Note applies to apps created for both Windows Mobile and Windows CE devices. For some additional information, see this Tech Note.
Creating a proper installer for Windows CE and Windows Mobile can be quite complex. NS Basic/CE makes this easy for you to do.
For simple apps, all you need to do is choose Start under the Run menu. It will create two files in the same folder the project is saved in:
[appname].Installer.cab: An install file that can be copied to the device and run. It will put your program into \Program Files\yourCompanyName, set up an entry in the Programs screen and install all needed components so your app will run, including dll files. (If you need this file, there is an option in Tools...Options to retain it.
[appname].Installer.exe: Does everything the .cab file does, but starts from a Windows desktop system. It displays a ReadMe screen and a EULA before copying to the device and starting the installer automatically. It is this version you will usually distribute to your users.
If Run Automatically is selected in Tools...Options (that's the default), the installer will run immediately after it is created.
Creating the default installer will work fine if your app only uses the NSCEPictureBox control and does not need any additional files. There are a number of options you can take advantage of to improve your installer or to install additional files.
| Title | Unless you specify otherwise, the title shown in the Programs screen will be the same as your project name. You can specify your own Title in Project Properties. |
| Company Name | Unless you specify otherwise, the Company Name shown in the installer will be your project name, with "Co" added on. You can specify your own Company Name in Project Properties. The Company Name is also used as the name of the folder created for your app in \Program Files\ on the device. |
| Icon | Specify in icon file in Project Properties. You can design an icon file using the freeware tool IcoFX. For more information on what your icons should look like, see the MSDN article "Compatible Icons". This icon will display in the finder and on the Programs screen on the device. Which sizes are needed depending on what devices you are supporting. If you want to support all devices, you will need at least the following: 16x16, 21x21, 32x32, 43x43 and 64x64, in 32 bit color. If you want your app to look pretty when viewed on the desktop finder, put in a 48x48 as well. A good free tool for making .ico files is IcoFX. (For information on the Start Screen PNG file, see below.) |
| ReadMe.txt | When you run the .exe version of the installer, the first thing displayed will be a ReadMe screen. You can specify the path to the ReadMe file in Project Properties. If you have not created a ReadMe.txt file, NS Basic/CE will automatically create one. You are welcome to edit this file: it will not be changed by NS Basic once it is there. |
| EULA.txt | The EULA (End User License Agreement) is displayed after the ReadMe when you are running the .exe installer. It will ask the user to agree to it before proceeding. In it, you should specify the license terms for your software, even if it free. You can specify the path to the EULA file in Project Properties. If you have not created a EULA.txt file in your project's directory, NS Basic/CE will automatically create one. You are welcome to edit this file: it will not be changed by NS Basic once it is there. |
| Install Dir | In Project Properties. Specifies the name of the directory in \Program Files where your application should be installed. If you leave this blank, your app will install to \Program Files\[program_name] |
| Dir to Include | The name of a directory you would like to have installed with your app. It will be put into the Install Dir on the device. This is a good way to include a number of files, sounds or images that your app will use. |
You can specify additional files, controls or programs to be installed with your app by adding them as Resources to your project. There is no need to add NSCEPictureBox: it is added automatically.
The standard controls that come with NS Basic/CE are in the folder \Program Files\ce\controls\[Platform], where Platform specifies the type of device you have. For example, for Windows Mobile devices, Platform is "WM".
| Resource Type | Should be set to "Installer File" for files to be included in the installer. (default) |
| Install To: | Set to "Project Install Dir" for files to be installed to the "Install Dir" specified in Project Projects. Set to "Windows" for files to be installed in the \Windows folder. |
| Register | True or False. If set to True, the control will be registered at installation. Only applies to .ocx and .dll files. Not all controls require registration. Attempting to register a control that does not allow registration will result in an unsucessful installation. |
| Shared File | For files which may be used by more than one app. The system keeps a count of how many apps use the file: it will only be deleted when the count drops to zero. |
There are some options in Tools...Options that you can use to change how the installer is made. If you are making a normal Windows Mobile app, you probably will not need these options.
| Create compressed CAB file | Normally False. Use this option if you want to use the CAB file for installation, not the exe file. Compressed CAB files will not work on older devices, such as Windows Mobile 2003, but may install more quickly on newer devices. |
| Retain CAB file | Normally False. If set to True, the CAB file will exist in your project's directory after running Make Installer. |
| Delete Work Files | Normally True. If set to False, the app.inf, app.ini and app.bat files will existing in your project's directory after running Make Installer. These files can be useful if you want to create your own installers based on the generated ones, as well as for debugging. |
| Language | The language for the prompts in the installer that is produced. Options are English, German, French, Italian, Portuguese, Swedish and Spanish. |
| Platform | The type of device you have. The choices are: WM - Windows Mobile devices (default) 1824 - ARMV4i, ARM720 2336 - ARM920 (seems to be the same as 2577) 2577 - ARMV4, StrongARM, SA1100 4000 - MIPSII |
| Get Device Info | This button will display information on the currently connected device. It can be used to determine what the platform of the device is. |
By making the parts of your image transparent, you can create an icon with the look and feel of the built in icons. An inexpensive tool you can use to do this is IrFanView (free for non commercial use). When doing the save as PNG, tell it to Save Transparent Colour, and then it asks you to click on the image for the color you want to set.
Microsoft has an article on Creating Custom Icons for Windows Mobile 6.5.
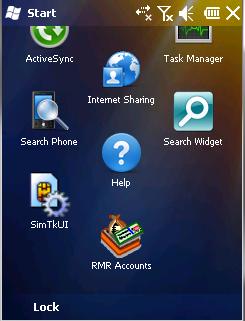
Here is a sample start screen, with an icon contributed by RMR Software and Andy Waller. Check out the "RMR Accounts" icon at the bottom.
Pocket PC 2003 Devices: If there is more than one NS Basic app on a Pocket PC 2003 device, uninstalling one of the apps will result in the message "Could not retrieve registry value for NSBasic. Please reinstall." when you run an NS Basic app still on the device. If you reinstall the existing app, the problem will be cured. Windows Mobile 5 and later devices work properly.
Advanced Installers: NS Basic/CE leaves the work files it uses to create the installer around so you can modify them to do more advanced installation features. The following files are created in your project's folder:
| App.bat | The batch file which uses the .inf and .ini files to create the CAB and EXE installers. |
| App.Inf Shortcut.xml | These files are used by CabWiz to create the cab file. They list all the files, where they come from and how they are to be installed. For more information on the .inf file format, see TN30a.htm. |
| App.Ini | This file contains the information used by EZSetup to make the exe file from the CAB file. |
InstallerCabWiz.log Installer.log InstallerErr.log |
Messages from installer, if there were errors: -Output of App.bat -Errors produced by App.bat These files will not exist if the installer is created successfully. |
| Eula.txt ReadMe.txt | See above. |