The sample program lets you set up an event driven, object oriented application in BASIC. It's fairly short, and hopefully easy to understand. It should give you a feel of how quick and easy it is to create fairly sophisticated applications in NS BASIC.
O. Install NS BASIC
Download the following packages from the Demo diskette:
NSBASIC.PKG
Vdesign.pkg
MakePkg.pkg
1. Try a little program.
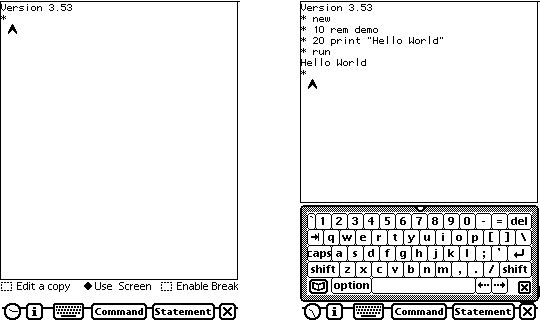
Start up NS BASIC. Using the keyboard, tap in the following program. f
you don't have a Newton keyboard, tap the on screen keyboard icon. (If
you wanted, you could also use the keyboard and screen of your Mac or
PC)
* new
* 10 rem demo
* 20 print "Hello World"
* run
You'll get "Hello World" back. You've just written and run your first program on a Newton.
Now, let's do something a bit more substantial.
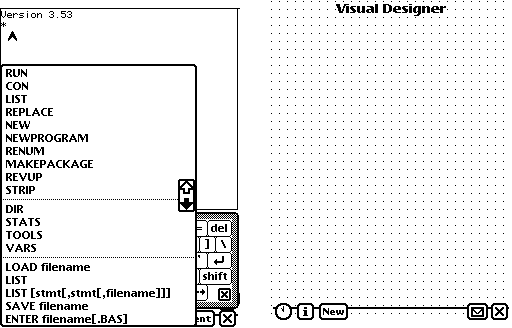
2. Create a real program using the Visual Designer
Tap the Command button, then select NEWPROGRAM. Some asterisks will appear
and the Visual Designer will pop up. The Visual Designer lets you layout
and customize the visual object of your program.
To create an object, use the Newton insertion carat (Write  ) or tap New. Scroll down to the
Title object, and select it. It will display on the screen along with the
Property floater: tap on Property to see a list of properties for this
object.
) or tap New. Scroll down to the
Title object, and select it. It will display on the screen along with the
Property floater: tap on Property to see a list of properties for this
object.
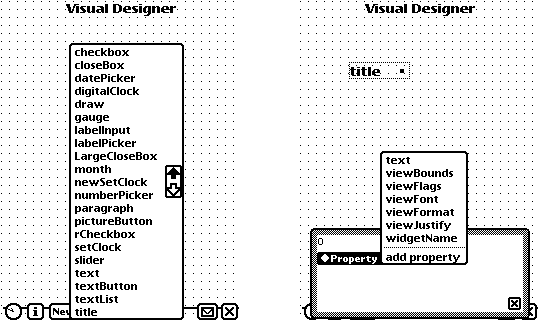
The Visual Designer is a WYSIWYG editor. You can drag the objects around the screen to where you want them, or drag the little square box inside to resize them. Using the Properties, you can customize in all sorts of ways. Here are some of the options.
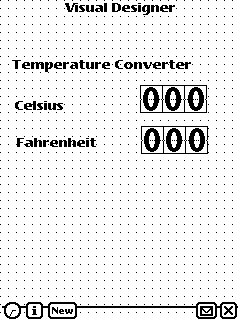
Add the rest of the objects
Now add the following widgets:
1. A title called Celsius
2. A title called Fahrenheit
3. A NumberPicker to the right of Celsius
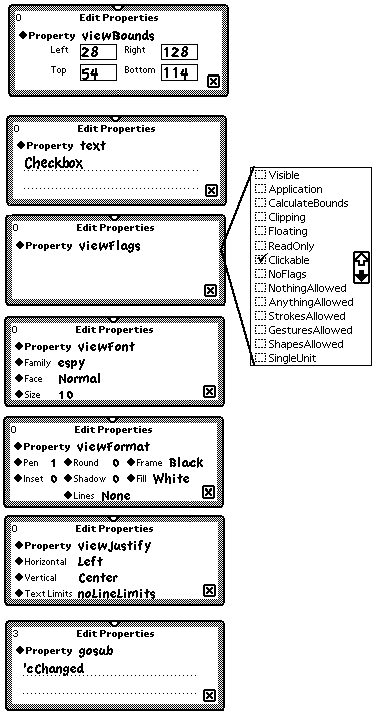
4. A NumberPicker to the right of Fahrenheit The width of the NumberPicker objects is computed from the MinValue and MaxValue properties. You will also need to use Add Property to add a GOSUB slot to the two NumberPickers. Set the value of celsius to 'cChanged and fahrenheit to 'fChanged. (The single quote is important).
Your screen should look like this:
3. Customize the program
Exit the Visual Designer. You will return the NS BASIC "*" prompt. You already have a running program:
to test it, type RUN. Use the close box in the lower right corner to exit your program. You can also type
LIST to have a look at it. If you'd like to get back to the Visual Designer to
make some further changes, type
EDIT 50.
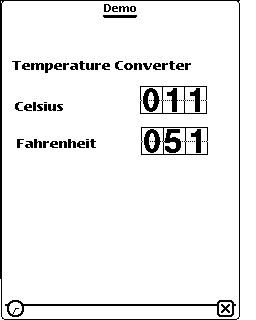
To make it do the actual calculations, you'll need to add a bit of code. Type in the following lines:
200 cChanged:
210 setValue(layout_0.fahrenheit,'value,floor(layout_0.celsius.value*9/5+32))
220 return

300 fChanged:
310 setValue(layout_0.celsius,'value,floor((layout_0.fahrenheit.value-32)*5/9))
320 return

9020 bye
Run the program again to test it.
HereÕs the complete listing of the program, for your reference. If youÕd like to know more about some of the statements used in the program, check out the NS BASIC Handbook.
0010 REM program template
0020 appSpec={goto:'endProgram,title: "Demo"}
0030 window app,appSpec,"APP"
0040 show app
0050 widgetdef Layout_0
0060 window wlist,Layout_0
0070 show wlist
0100 wait -1 // indefinitely

200 cChanged:
210 setValue(layout_0.fahrenheit,'value,floor(layout_0.celsius.value*9/5+32))
220 return

300 fChanged:
310 setValue(layout_0.celsius,'value,floor((layout_0.fahrenheit.value-32)*5/9))
320 return

9000 endProgram: rem
9010 hide
9020 bye
4. Make it into a package.
While it's perfectly OK to run programs from with the NS BASIC development
environment, you can also create standalone Newton Packages. Here's how:
Tap the close box (NS BASIC will quit, because of the BYE statement at
line 9010. Go ahead and restart: the program will still be there.)
Type:
* save Demo
* makepackage
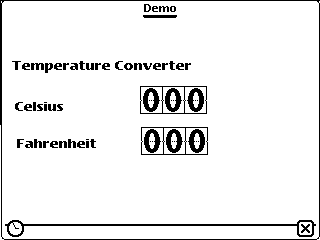
A progress box will display and in about 30 seconds, will complete. Exit NS BASIC.
Tap the new icon in the Extras drawer called ÒDemoÓ and try it!
5. Try out rotated mode.
To show off some more, let's rotate the app. Exit it, and use the button
in the extras drawer to rotate your Newt. Try the Demo App again...
The package that has been created is a normal Newton package. You can do all the usual things to it: back it up, beam it or send it through the serial port to another Newton. It can be distributed to other Newton users on a royalty-free basis.
Feel free to modify the demo program or even write new programs!
If you have any questions or problems with this tutorial, please contact us at support© nsbasic.com, fax 416 264-5888, or voice 416 264-5999.
Last update: January 10, 1997