For me, the Newton Connection Kit is indispensable for installing packages and synchronising data between my Newton and Mac. It's possible to get by without the Newton Connection software, but you really can't do without a serial cable.
Some commercial software, distributed on floppy disks, come bundled with Apple's Newton Package Installer software. Packages, such as Figgles' Typomatica or NS BASIC, allow you to type information directly into your Newton via a terminal emulator. All you need is a serial cable.
If you are a Mac user, connecting your Newton MessagePad to a Mac is simple. Buy yourself a standard LocalTalk cable. It's readily available at most Macintosh resellers or electronics stores.
If you are a PC user, getting a suitable serial cable is not so easy. I wanted a Newton-to-PC cable for my laptop computer, but I didn't really want to buy the Windows version of the Newton Connection Kit. So I made my own cable.
You can do the same. Or ask a friend who's handy with a soldering iron to help you.
You will also need soldering equipment and a circuit testing device, such as a multimeter. If you don't have one, a battery, a light bulb and two short lengths of wire will work.
2. Carefully remove the insulation from the end of each wire. A few millimetres is sufficient. Do the same for both ends of the short length of wire.
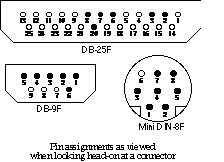
3. Match the wires to the connector pins using the multimeter. If you intend to use both halves of the cable, you will need to identify the pins at both ends as they are wired in a slightly different way.


| mini DIN-8M | DB-9F | DB-25F | ||
| Pin | Name | Pin | Pin | Name |
| 1 | HSKo | 1 & 6 | 6 & 8 | DSR & DCD |
| 2 & 7 | HSKi & GPi | 4 | 20 | DTR |
| 3 | TxD- | 2 | 3 | RxD |
| 4 & 8 | Gnd & RxD+ | 5 | 7 | Gnd |
| 5 | RxD- | 3 | 2 | TxD |
| 6 | TxD+ | - | - | NC |
6. Test the wiring connections before you fit the connector into the casing.
The Newton Connection Kit is a must for any serious Newton owner. But for me, an extra cable gives me more flexibility.
Stephen works at Skilled Solutions as a technical writer and training consultant.
E-mail: wongs© ozemail.com.au. Ph: (02) 212 5100, Fax: (02) 212 1708