|
The
Desktop Environment
Let's start by looking at the main development screen. From
this screen, we do all the development of the project.
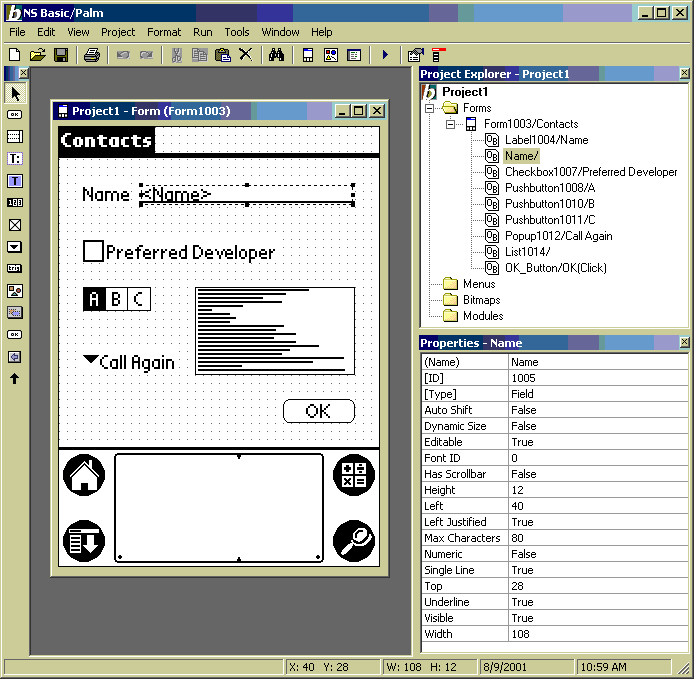
The Palm Screen on the left shows the appearance of the form
you are working on. When you select an object, its properties
appear in the Properties Window on the lower right. In the
example above, the field Name is highlighted. You can see
the properties that can be set for this object.
On the left edge of the IDE are icons for the various objects
you can place on a form. There are 13 there. The PalmScreen
shows a few: there's a Label, a Field, a Checkbox, a Pushbutton,
a Popup, a Listbox and a Button. Not showing are a bitmap,
Gadget, Repeater, Scrollbar, Selector or Shift Indicator.
The objects are all standard Palm OS objects, with the same
look and feel as the built in apps.
You can double click on an object to see its code.
The top right panel is the Project Explorer. Use this to
navigate the your project. You can have multiple forms, each
with its own list of objects. Each form has properties you
can edit in the Properties Window. Each form also has before
and after code you can edit.
The Menus section describes any menus you have created.
The Bitmaps section of the Project Explorer lets you include
one or more bitmaps into your program. Bitmaps can be bmp,
gif or jpg files: NS Basic/Palm will convert them to Palm
format. Color bitmaps work great!
The Modules section allows you to add external NS Basic/Palm
modules into your project. This makes it easier to reuse common
code blocks between multiple projects. NS Basic/Palm has over
150 statements and functions.
If you click Project, you can edit your project's properties
in the Properties Window. You can also define startup and
termination code.
|
Continue the Tour
© NS BASIC Corporation. All rights reserved.
Features and specifications subject to change.
|
|
